Title image credit Zak Fields
Introduction
With rare exception, Internet of Things (IoT) projects collect data from one or more sensors, then send some or all of the sensor data to the cloud for further analysis. The collecting device may preprocess the data before sending it, but that’s generally how these projects work.
Adding a sensor to your IoT project isn’t hard, you just wire the sensor to the collecting device, then write the code to read the sensor and send it to the cloud. There are, however, many ways this can go south if you’re not careful. We created this article to share some lessons learned with this type of project.
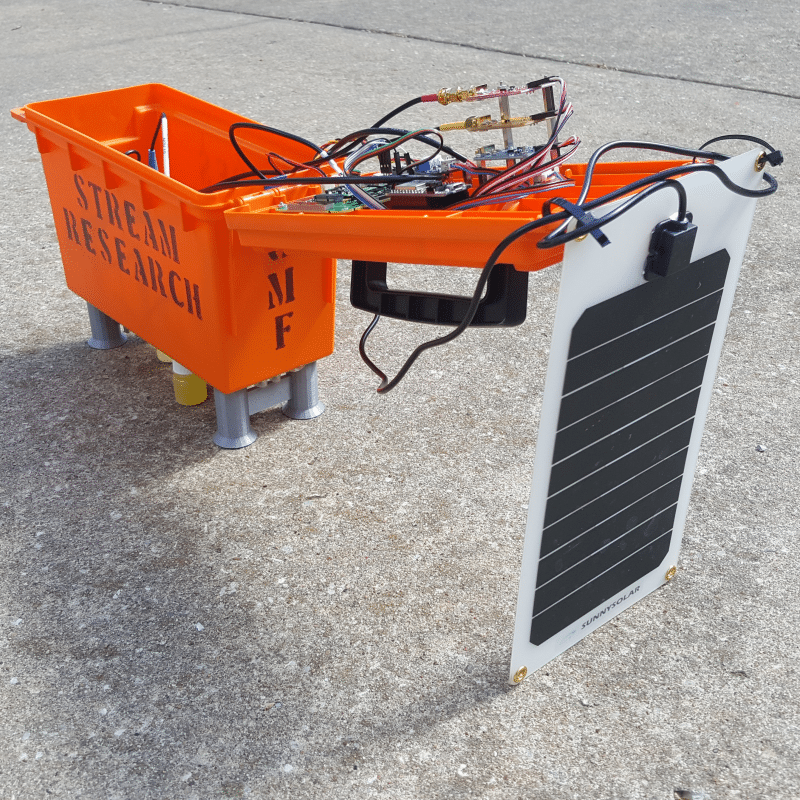
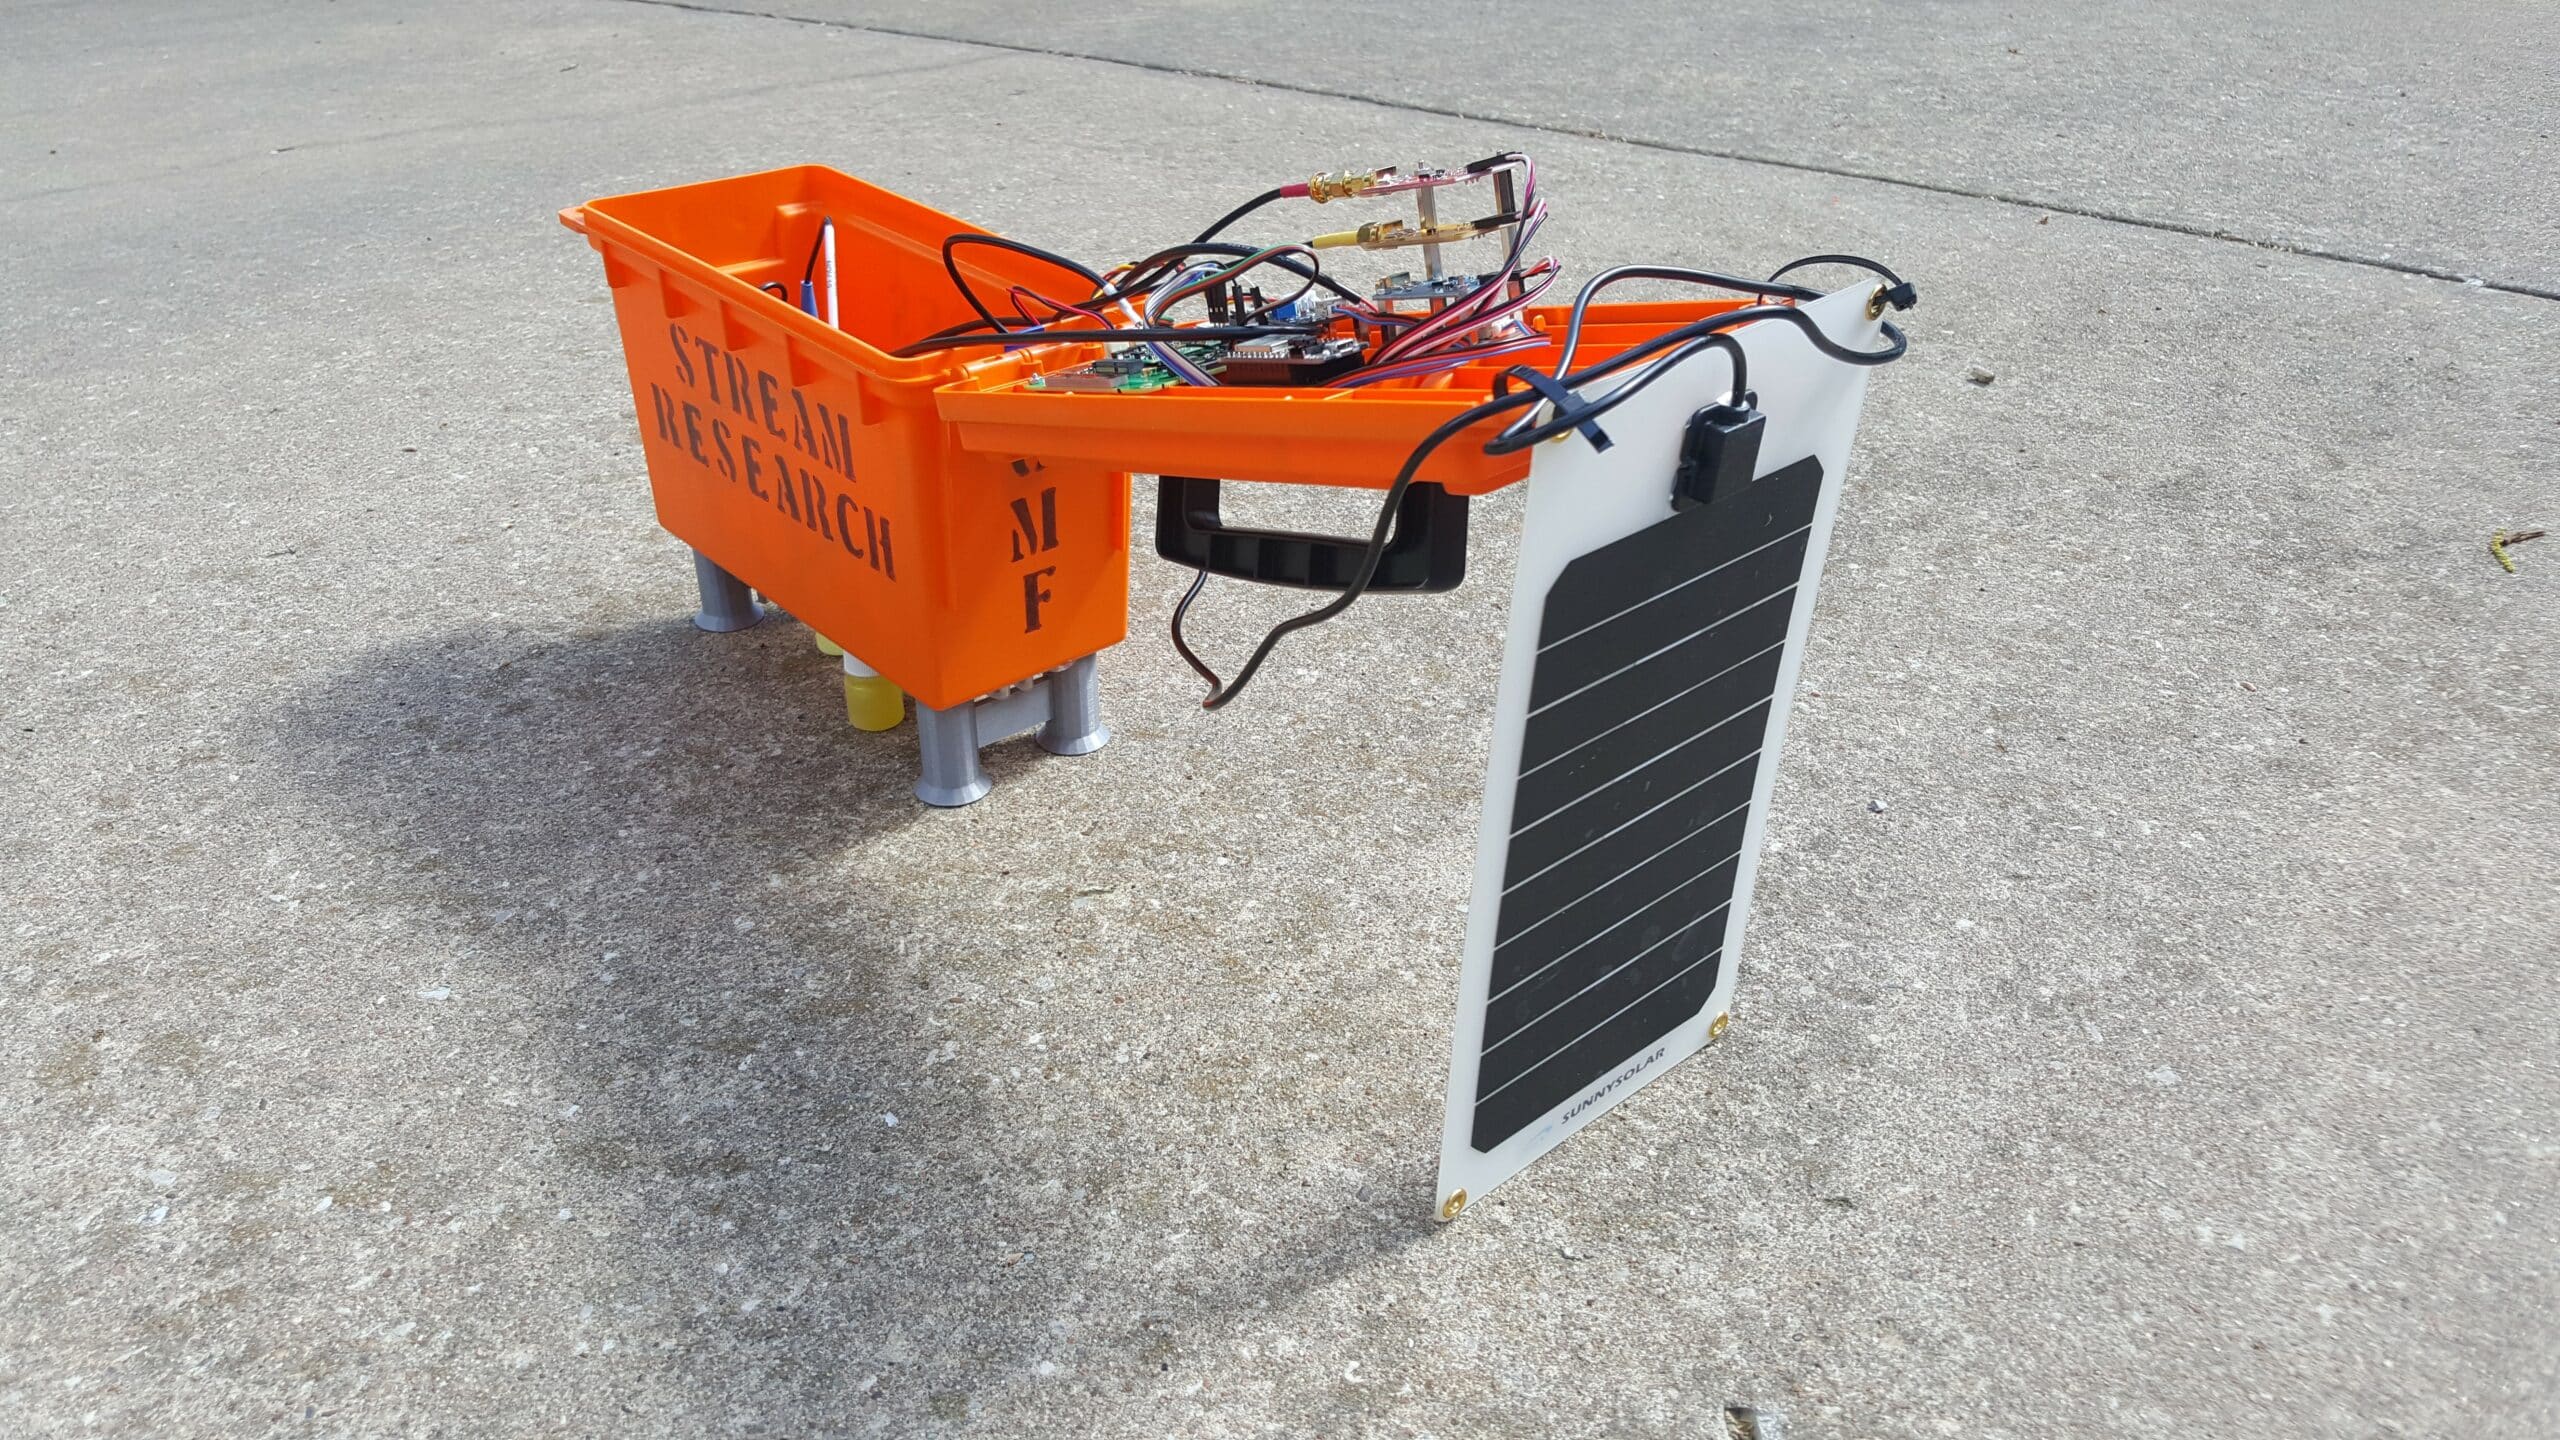
The source material for this article comes from a webinar entitled Don’t Make These 5 Mistakes on Your First Aquatic Sensor by Zachary J. Fields. For an Earth Day project, Zak built a Waterborne Environmental Testing (WET) box to measure water quality in Flat Creek on his family’s farm in Cassville, MO. Although the project initially worked as expected, it did not have the longevity needed to collect a sufficient data set – hence the reason for this article. If you listen to Zak’s webinar, you’ll know that it could almost have been subtitled “Don’t make the same mistakes I did.”
#1: Plan for Catastrophic Failure
Placing any electronics project out into the elements is challenging, especially when the project consists of many electrical components and sensors cobbled together. The most important thing to remember is that Mother Nature never signed off on your project, then plan accordingly. She may not know anything about your project, or your project may not be very interesting to her, but you have to keep in mind that she’ll gladly accept your sacrifice on the alter of science.
With that in mind, what do you do?
- Use a waterproof enclosure: Look for a closed container with tight seals. Don’t be cheap when purchasing the enclosure – using a plastic ammo container just isn’t enough. If you intend for your project to float, a sealed container helps hold air in and keep water out for best float potential.
- Use bright colors: Not if, but when, Mother Nature moves or wrecks your project, it could be miles downstream and bright colors are easier to locate in a crowd (or on a creek bank) than dull colors.
- Insulate the project container: Sensor projects that run outdoors encounter a wide variety of conditions from very cold to very hot temperatures. All of the electronics components in your project have a documented operating temperature range and add insulation to the enclosure can help regulate internal temperatures and minimize condensation.
- Pay attention to your enclosure’s center of gravity: Sensor projects that float in a river or lake run the risk of capsizing, make sure you put the right amount of ballast in the bottom of the enclosure to maintain proper position while in the water, especially in high winds or waves.
- Orient your project’s circuit boards in the enclosure so that water will fall off of them if moisture builds up inside the enclosure or if water leaks in. Arrange them vertically if you can.
- Put your contact information on the enclosure: when Mother Nature sends your project downstream (or wherever), you want whoever finds the enclosure to be able to let you know they have it. If you don’t, you’re throwing away the money you spent on your project.
- Use GPS to your advantage: If your project does get swept away, it’s much easier to locate if you always know where it is. Many IoT devices (like the ones from Blues Wireless) include GPS radios so you can capture the device’s current location and send it to the cloud. Make sure you enable GPS on your device before you deploy it, or at least enable an option that lets you remotely enable it and find the device if it’s swept away in a storm.
- Use a locking clasp on the enclosure: You’ve got a lot invested in this project (time, brain power, and money) so leaving the project out in public is a risky proposition. The majority of people in the world who discover your project will leave it alone, but you can curb curiosity if you have your contact information on the enclosure with a brief description of the project’s purpose. Short of stealing your enclosure outright, someone may damage your device by simply opening it up to see what’s inside. A locking clasp on the enclosure may help to curb curiosity, and keep someone from poking around inside and possibly damaging components.
- Water is a Force Majeure – it will destroy anything it can.
- Use a breakaway Anchor point if you’re floating the enclosure in a stream. That way, when water levels rise beyond the length of your rope or chain, it will break away (and still float) rather than get completely submerged.
- Field test your enclosure as much as you can in a safe environment. If it fails there, Mother Nature will kill it easily.
- Don’t forget about grommets. Any time you connect something outside the enclosure to the inside of the enclosure use an appropriately sized grommet (as small as possible) to seal the opening around the item (sensor, wire, whatever).

#2: Plan For Periodic Device Maintenance
You may think that you’ll never have to touch the project again after you deploy it, but there’s no guarantee of that. When you size your enclosure, make sure you leave enough room to work inside the enclosure (with access to all of the components) or mount everything so you can easily pull out the components to work on or replace them.
Consider leaving extra room inside the enclosure for expansion, who knows, you may think of another sensor or two you want to add to the project later or you may have to replace something and the replacement is, for some reason, larger than the original.
If your project is mounted high or sitting in the middle of a river or lake and you won’t be able to get to it easily, enable something that lets you check the status of the device or pull data from the sensors from a distance. Use something like Bluetooth or other low-power wireless protocols to enable this. Even better, do everything over a LoRa or cellular network connection so you can interact with the device from anywhere in the world.
#3: Plan For Maximum Flexibility
I don’t know about you, but my project code never seems to be quite finished. I always think of some feature I want to add later or find a bug that initial testing didn’t expose. Even though you may not ever need this, plan for it. Select your compute platform with project firmware updates in mind.
Several IoT platforms enable remote firmware updates, and Blues Wireless is no different. Depending on your project’s selected microcontroller or single board computer (SBC), you may be able to update your project’s custom code remotely. With the Blues Wireless Notecard and an ESP32, you can easily update the device’s code using the Notecard host firmware update guide.
#4: Spend Wisely On IoT Sensors
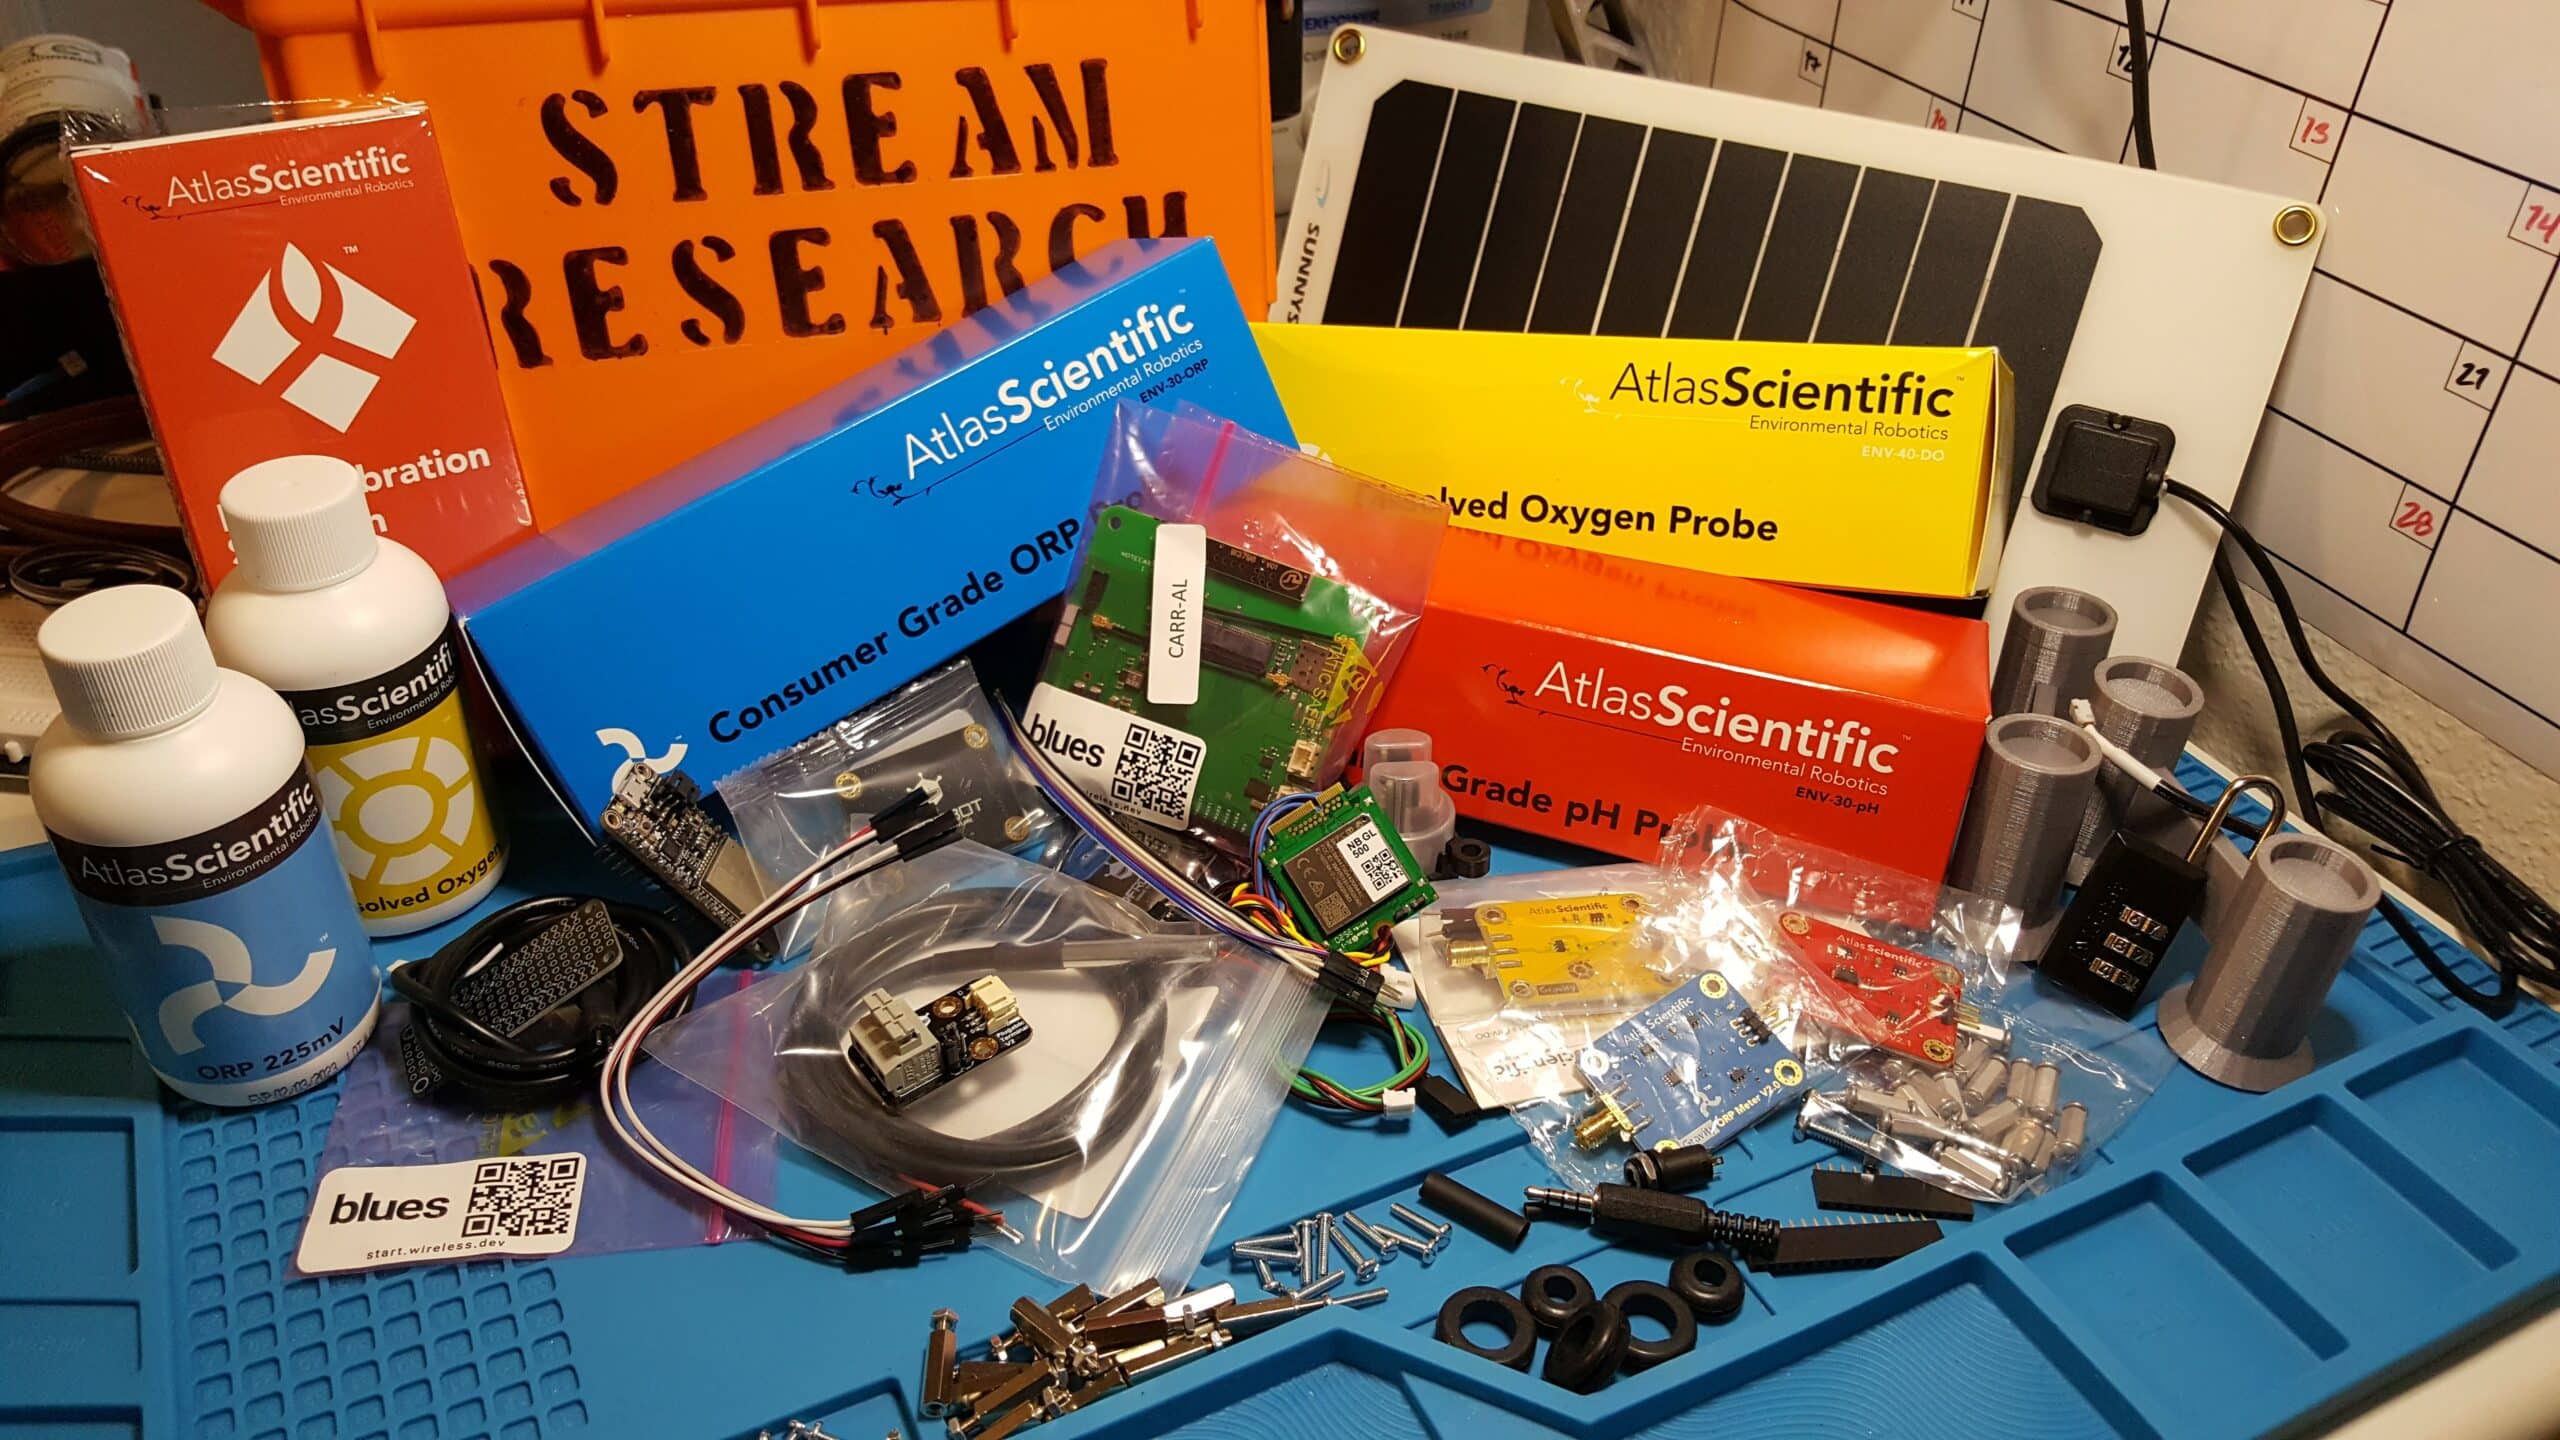
You’ll often have a variety of options for your project’s sensors, usually over a wide price range; the choice you make is driven by a variety of variables:
- Project budget
- Sensor Sensitivity
- Sensor operating range
- Compatibility with your hardware platform
As you decide, you’ll likely make tradeoffs based on any of those parameters. You can be flexible on some, but not others. For example, compatibility with your hardware platform and operating range aren’t something you can easily discount while cost and sensor sensitivity are.
If you’re lucky, you can balance sensor sensitivity with your budget. You don’t always have to go for the most expensive sensor depending on what you’re monitoring. Say for example you’re looking for a temperature sensor for a water quality project and you have multiple options available to you. For this particular application, do you really need to be able to measure temperature to 4 decimal places? That’s a requirement in a chemical processing plant, where a small difference in temperature could mean the difference between success and failure, but when capturing environment temperature for water quality, some flexibility in temperature accuracy shouldn’t be a problem.
You can think of it this way: treat your sensor sensitivity like the thickness of a pen used to graph the value. Low sensitivity, say for example 1 decimal point, would be a thick line and high sensitivity a thin line. Do you need the thinnest line to plot your project’s data? Does the measured value change so frequently that you need the smallest possible line to plot it? If not, go with the less expensive (and less sensitive) sensor for your project.
Find the balance between how much error rate you can tolerate in your data vs. how much money you have in your wallet to spend on sensors.
Another important decision criteria is how the sensor will be used. You must ensure that the sensors you pick are designed for prolonged in-situ use. Some sensors are designed for short immersion in the solution being measured while others are designed to be constantly immersed in the solution. Make sure you select the right sensor for the way your project will collect its data; you will use a different sensor if you’re dipping the sensor in an environment to take a measurement as opposed to keeping it immersed in the environment permanently.
#5: Monitor Conditions With Purpose
Be specific about what you want to measure and how you measure it. Ensure that the properties you measure are useful for the purpose of the project and help you paint the picture you need from your data.
Where possible, monitor complementary data, data that shows you multiple aspects of the environment you’re monitoring.
For example, to calculate the milligrams per litre (mg/L) from saturation percentage of dissolved Oxygen, you must additionally know the water temperature and salinity. Salinity can be determined using the level of total dissolved solids and the temperature can be collected using a thermocouple. By collecting complementary data, you can enrich your ability to collect valuable information.
And finally, error margin is not efficacy – results small enough to fit within the sensitivity range of the sensor are not an indicator of anything (nope, nothing). If you run some tests and that’s where your results lie, then it is time to pick a more sensitive sensor for your project.
#6: Monitor Your IoT Device System Hardware (device diagnostics)
As you plan your project, select your sensors, and decide what data values to track, don’t forget to also monitor your system hardware. Your project’s electronics (microcontroller, power system, etc.) have operating environment limitations you can ignore only at your peril. For example, microcontrollers can overheat and start acting erratically, and many electronics components are sensitive to moisture.
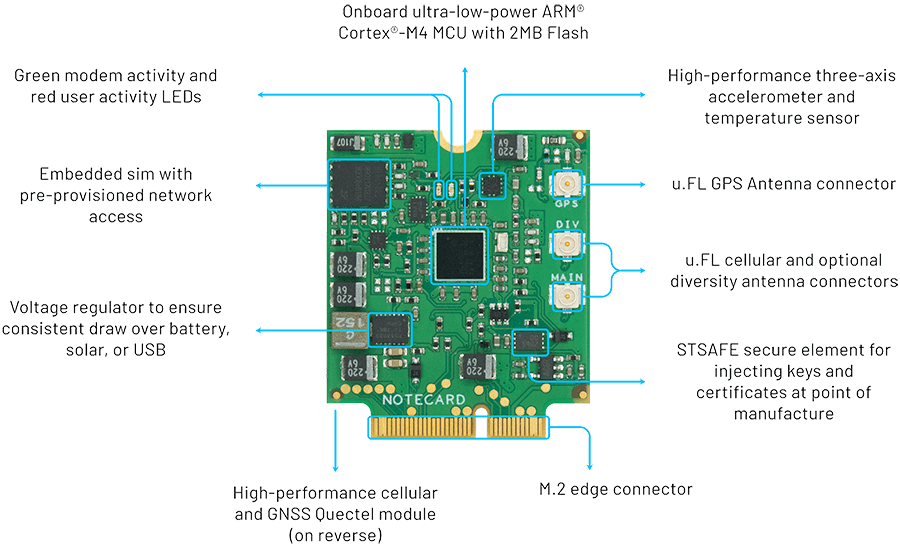
Notecards also include GPS sensors, an accelerometer and temperature sensor, so the package goes a long way to measure the project’s internal environment, its orientation and geolocation.
As you select your project hardware, you must ensure it will operate correctly in the environment across all time periods (night, day, summer, winter). You must measure critical operating environment properties and monitor them for variance outside of valid ranges. If your project works in or near a water environment, think about measuring humidity levels within the enclosure or sensing for any moisture if you think water may seep in.
Send your operating environment data to the cloud as well and set up alerts to let you know when any of the critical measurements range beyond what your hardware can handle. You may also want to consider powering off your project when this happens to protect it from permanent damage.
#7: Trust, but Calibrate
Don’t automatically trust the values reported by your sensors. Many sensors measure away and accurately deliver results from the start because they were pre-calibrated at the factory or just due to the very nature of the sensor. Other sensors have manufacturing variance that affect the results they deliver. Before you use these sensors in your project, calibrate each of them against a reference source. You may need to tweak the measured values to accommodate this variance.
You may also want to consider putting duplicate sensors in your project and comparing the values between the two sensors for accuracy. Some sensors degrade over time, especially if they’re constantly immersed in a hostile environment, so this dual sensor approach helps you know when it’s time to replace a sensor.
#8: Collect Locally, Calculate Cloudly (in the cloud)
Depending on how much network bandwidth you have available to your project, you may need to process the collected data on the device before sending it to the cloud. This only works, of course, if you have enough computing power locally available to do this.
Where possible, you should send the raw collected data to the cloud and process the data there. For some battery-powered projects, this helps by reducing the load on the battery and may give you more operating time on a set of batteries or available sunlight.
Having the raw data available in the cloud allows you to:
- More easily troubleshoot or identify unexplained variances in the results
- Apply new algorithms to the data as you learn more
- Factor in external factors, influences and correlated information
#9: Focus on The Hardware Project’s Core Requirements
When building a sensor project, spend time understanding and solving the core problem you set out to solve. Invest your precious time in your sensor choices, location, picking relevant data points, and managing power constraints (many projects will be solar/battery powered). When possible, leverage components and services that allow you abstract or defer non-primary concerns (e.g. data transport, data visualization, etc.).
Get the project collecting the data you need, then find an existing service to move that data to the cloud as opposed to building that infrastructure yourself. Fortunately, the Blues Wireless solution handles a lot of that for you using NoteHub. All data sent through Blues Wireless devices automatically streams to NoteHub, and you have many options for automatically moving the data from there. You can even change the final destination later or stream to multiple destinations simultaneously.
#10: Build Dashboards for Easy Consumption
Data must be visualized to be understood. Once you have your sensor data in the cloud, don’t spend time downloading into spreadsheets and such for data analysis and display. Use the built-in tools from any of the free (or paid) cloud IoT platforms to store your data and display it in one or more dashboard pages with data tables and graphs.
The purpose for collecting this data is to take action or understand the environment. However, it’s very difficult to reason about raw sensor data, which is why interpreting the data is so very important. Proper visualization and interpretation become increasingly more important the farther removed a person is from device construction.
#11: Manage Your Project’s Power Consumption
If your project runs indoors or near a reliable source of electricity, then you’re in good shape. You probably won’t have to worry about power consumption.
Things are different for projects running in isolation (in the wild) since the project likely runs on battery power. This means first that you must be careful when selecting your computing platform and sensors to ensure that they run on the amount of power you can put inside the box. Next you have to implement whatever strategies you can to minimize the amount of power your project consumes over time, so you can get the maximum use from your project’s batteries.
When you add solar panels to a project, you have the means to recharge the project’s batteries. This is good, but only works when there’s enough natural light to recharge the batteries. You must ensure the solar panels don’t get covered up with leaves or other gunk and that weather conditions don’t restrict the panels access to enough power to charge the batteries. A big storm with lots of dark clouds could allow the project’s battery to die, so your project may stop collecting data until the storm passes.
You’ll also have to take into account how long it takes for your sensor to wake up with the processor; some sensors take a while to initialize, so you’ll want to allocate some additional wake time for that.
The good news is that most microcontroller platforms provide the ability to sleep periodically (e.g. Espressif ESP32), which can greatly reduce battery consumption. Leveraging this ability, you can configure the device to wake up on a schedule, do whatever work it needs to do, send data to the cloud, then go back to sleep.
This approach eliminates a lot of strain on your battery, but can be complicated to implement because you’ll have to implement additional code to manage this process. For example, how do you accurately determine how much time the processor spends awake? What happens if the device can’t connect to the network during the wake period? You’ll have to queue up the data which means writing some complicated code to carefully manage the microcontroller’s local memory cache. What do you do when the queue fills?
More good news is that the Blues Wireless platform handles much of this for you. Blues’ founder created the platform specifically to address the needs of network connected devices operating in low power conditions (or at least conditions where electricity is not readily available).
He built the Notecard so it sips power. The Notecard includes power optimizations like queueing data, so when it can’t send the data immediately, it sends it later when it connects to the network. You can also configure the Notecard (this truly is a configuration setting, not code you have to write) to connect to the cellular tower based on the charge levels of your battery, allowing you to preserve battery life when you need it most. Notecard can also disable your attached MCU, then reenable it on a timer. With the right strategy, you can run on battery power for extended periods.
Hold on, it even gets better.
For many projects, the Blues Wireless Notecard rides in one of the Notecarrier devices Blues produces. The Notecarrier AF is special because it hosts the M.2 connector the Notecard rides in as well as a socket for a microcontroller based on the Adafruit Feather specification. This means you can directly connect any compatible Feather device (notably, the Swan device from Blues Wireless) to run your project.
With the microcontroller in place, you can configure the Notecard to put the microcontroller to sleep, then wake on a schedule or a specific event. When everything wakes up, the microcontroller collects data from the sensors, writes its data to the Notecard’s queue, then lets the Notecard manage how and when it delivers the data to the cloud. You can configure the Notecard to send data whenever it has some, but more efficiently you can send data in batches (every hour, for example, or daily) depending on your project’s needs.
This strategy dramatically reduces the power load of the entire system and should give you excellent battery life.
If you have to run your project on batteries, make sure you select batteries that can handle the environment you project runs in. Some batteries can’t handle extreme temperatures, especially really cheap batteries. An excellent source for long life batteries is Tadiran, their different models offer extremely long shelf lives.
Conclusion
If you’ve made it this far, congratulations, there are over 3,000 words in this article alone. You’ll now be able to step over the muddy puddles of IoT device prototype development and build a better device. If you like what you learned about our Notecard, consider getting one. Even if you buy the most expensive one you’ll pay less than $69 for the device, and that includes 500MB of data usable over 10 years.
You’ll be able to go from unboxing to sending arbitrary data over the cellular network in 30 minutes or less. The tooling you need is already baked into your web browser, no download required. Would you believe if you order a pizza for delivery, then began our getting started tutorial, you’d be able to celebrate your new connected device with a fresh, hot slice of pizza? If you give it a try, post your pizza/notecard selfie on Twitter and tag us @blueswireless, we think that’d be pretty cool. 🍕🍕🍕🍕🍕🍕